利用SSH实现在Jekins中给远程服务器部署项目
文章目录
简要记录如何整合Jenkins与SSH免密登录,实现通过Jenkins流水线部署到不同的服务器环境下,提高开发与测试环境的灵活性。
背景
在KubeSphere中通过Jenkins流水线部署时,可选择部署到KubeSphere原生支持的Kubernetes中或部署到Docker容器中,从流水线配置的角度而言,除了最后一个阶段部署环境的不同,其它阶段都是类似的。
部署到Kubernetes:
部署到Docker:
两种部署方式对比如下:
| 部署到Kubernetes | 部署到Docker | 备注 | |
|---|---|---|---|
| 环境配置难易 | 复杂 |
简单 |
K8S集群配置和验证较为复杂Docker的安装较为简单 |
| 流水线配置 | 低 |
高 |
在Docker环境下需要为每个服务器配置ssh认证 |
| 使用便利性 | 高 |
中 |
K8S能与KubeSphere无缝整合,日志查看与操作更方便Docker环境下只是依赖KubeSphere做可视化部署 |
| 可迁移性 | 高 |
中 |
每新增一个Docker环境都需要重新配置对应的ssh认证 |
| 可扩展性 | 低 |
中 |
K8S需要添加集群节点Docker需要配置ssh认证 |
目前大部分项目都是直接部署到Kubernetes而部分项目由于环境以及运维等特殊考量采用的是直接部署到Docker,由于此种方式下配置流水线较为复杂,本文将相关操作过程简单记录下,供后续参考。
SSH远程执行
理论基础
部署到Docker的理论基础是通过Jenkins所在的宿主机(目前部门内部的Jenkins与KubeSphere都在同一台宿主机上)通过SSH(Secure Shell)在要部署的服务器上执行Docker相关执行,将之前需要手工执行的操作步骤以自动化的方式替代。
关于SSH远程执行的相关操作说明,详情请参见 SSH远程执行任务 ,常用的指令如下
# 执行单条指令
ssh nick@xxx.xxx.xxx.xxx "df -h"

# 执行多条指令
ssh nick@xxx.xxx.xxx.xxx "pwd; cat hello.txt"

# 远程执行脚本,不带参数
ssh nick@xxx.xxx.xxx.xxx < test.sh

# 远程执行脚本,带参数
ssh nick@xxx.xxx.xxx.xxx 'bash -s' < test.sh helloworld # helloworld即为传入的参数
考虑到基于Docker部署时需要先检测同名的Docker容器是否存在,如存在要将其先该容器停止并删除,之后再创建新的同名容器,这一系列操作直接用指令写很复杂也不便于阅读,用shell脚本替代较为合适。
同时考虑到要兼容多个不同的工程和版本,需要传递相关的参数进行区分,故最终采用的方案为以带参数的放方式执行远程脚本。
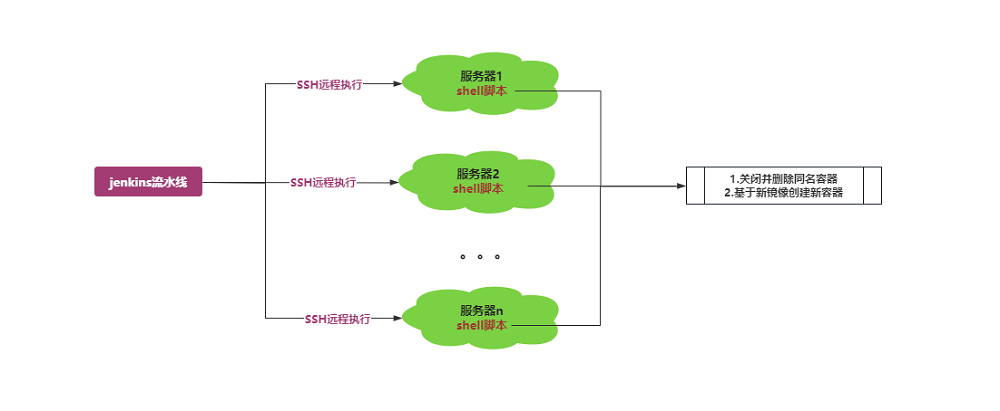
初略的架构图如下:
实际演示
假设现在有10.30.31.22和10.30.31.24这两台虚拟机,简单演示下在10.30.31.22中通过ssh远程访问10.30.31.24
-
远程执行指令

-
远程执行
shell脚本
免密登录
从上述运行效果图可看出每次执行ssh指令时都需要对应远程服务器的密码,这是一种交互式的操作,而如果我们通过Jenkins进行操作时,若要每次都输入对应远程服务器的密码,显然是不显示的,故需要进行免密登录的配置。
如何给ssh设置免费登录,详情参见 SSH远程免密登录,由于我们实际使用过程中是基于Jenkins调用ssh进行远程登录的,故不需要执行此部操作,只需要在Jenkins中设置免密登录即可。
Jenkins相关配置
此部分操作需要使用Jenkins管理员的登录,其用户名通常为admin。
Jenkins插件安装
此过程只需操作一次,之前已经安装完毕,此处记录只作为参考。
Jenkins需要安装SSH Agent Plugin来执行ssh指令,相关操作如下:
-
去
Jenkins官网根据当前Jenkins的版本去下载对应版本的插件,插件的扩展名为hpi -
以管理员账户登录
Jenkins,依次点击系统管理->插件管理->高级,在出现的界面中找到如下图所示的上传插件界面,选择对应的hpi文件并点击上传按钮上传对应插件,若对应文件的版本不兼容,会提示相应错徐消息
-
若能正常上传,在
系统管理->插件管理->已安装中列表中会出现刚才安装成功的插件信息,通过输入SSH Agent Plugin可缩小范围查询,至此整个插件安装完成。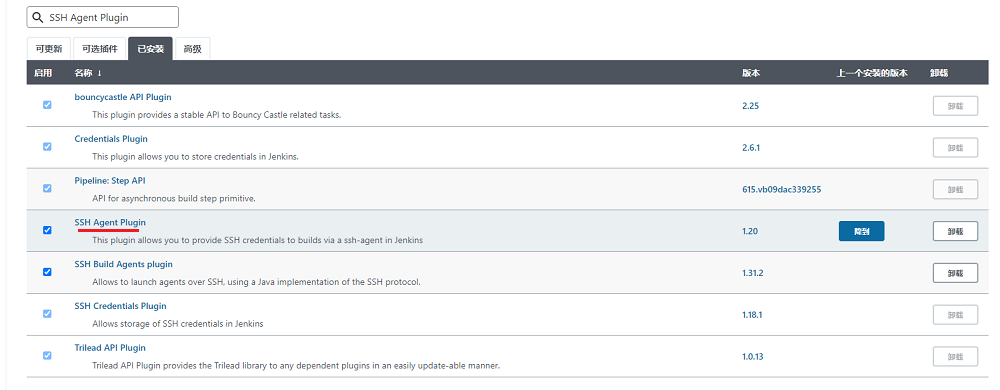
Jenkins配置
每增加一个远程服务器时,都需要仿照下述说明在
Jenkins中添加相关的配置。
生成公钥与私钥
-
在要执行的服务器上执行下述指令,检测
ssh目录是否存在ls ~/.ssh/ # 如果该目录提示不存在,需要先ssh localhost用root用户登录一下ssh -
以
root账户或其它具有权限的账户在终端中执行下述指令来生成秘钥# 邮箱名称可根据实际情况填写 ssh-keygen -t rsa -b 4096 -C "xxx@xxx.com"执行过程中一路按
Enter键即可,执行结果类似如下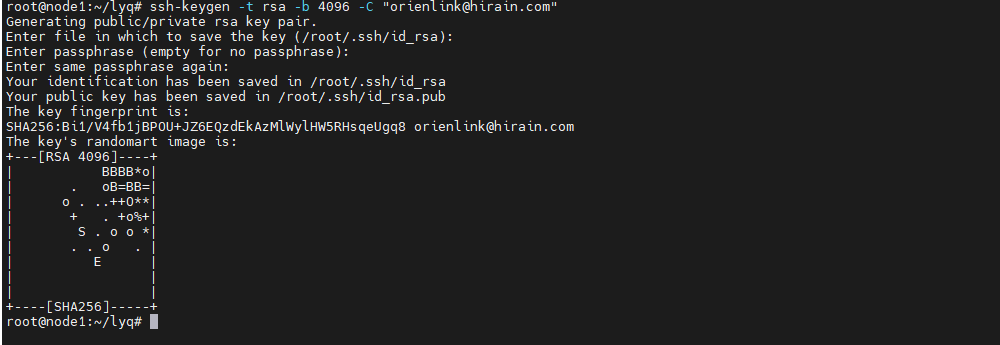
-
执行下述指令,将公钥写入到
authorized_keys文件中(若缺少此步骤会导致Jenkins进行免密登录时一直认证不通过)cd ~/.ssh cat id_rsa.pub >> authorized_keys执行结果输出类似如下,至此公钥与私钥配置完毕。

Jenkins配置凭据
此文参考于Jenkinsfile 中配置使用 ssh agent 连接远程主机,可在该文章中查看详细的说明。
-
以
admin等具有管理员权限的账号登录Jenkins,仿照下图所示,依次点击系统管理->Manage Credentials会出现对应的凭据列表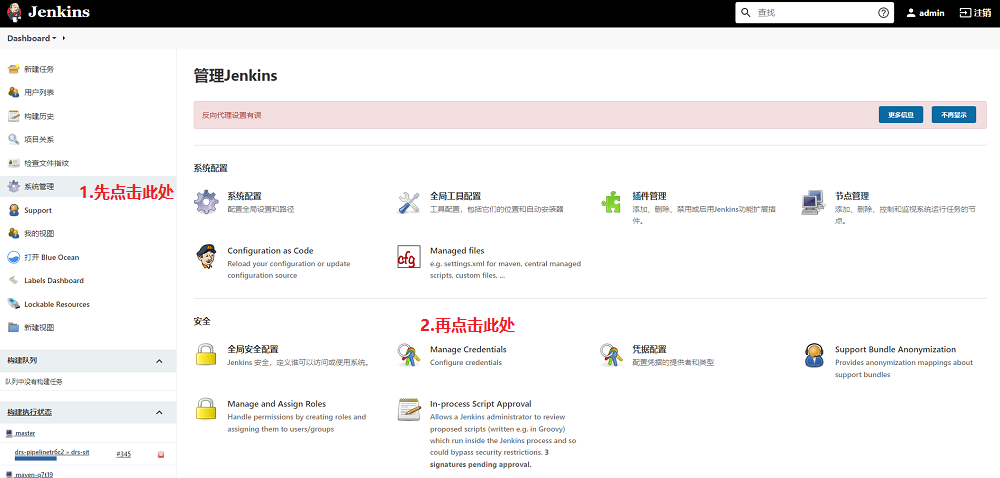
-
在出现的凭据列表中,点击任一个凭据的
全局链接,进入全局凭据列表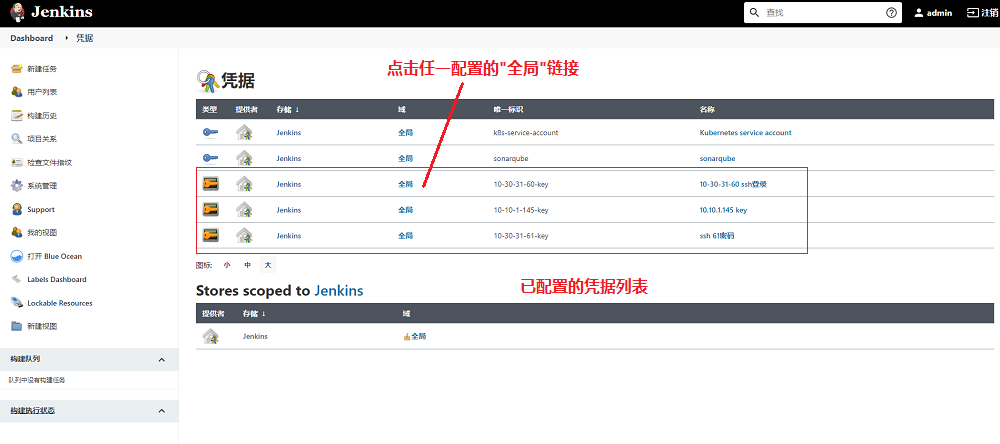
-
在出现的全局凭据列表中,点击左侧的
添加凭据链接,进入添加凭据界面
-
在出现的操作界面中,将类型设置为
SSH Username with private key,之后会出现类似如下界面,按照下图中的说明进行添加即可。
-
下图为基于
10.30.31.24填写的相关配置,填写完毕后保存即可,至此Jenkins凭据配置完成。注意: 为了让步骤3中显示的凭据列表更直观,更具有可读性,建议将
ID和描述填写的更具有可读性,如ID的格式为IP-key,具体到本例中为10-30-31-24-key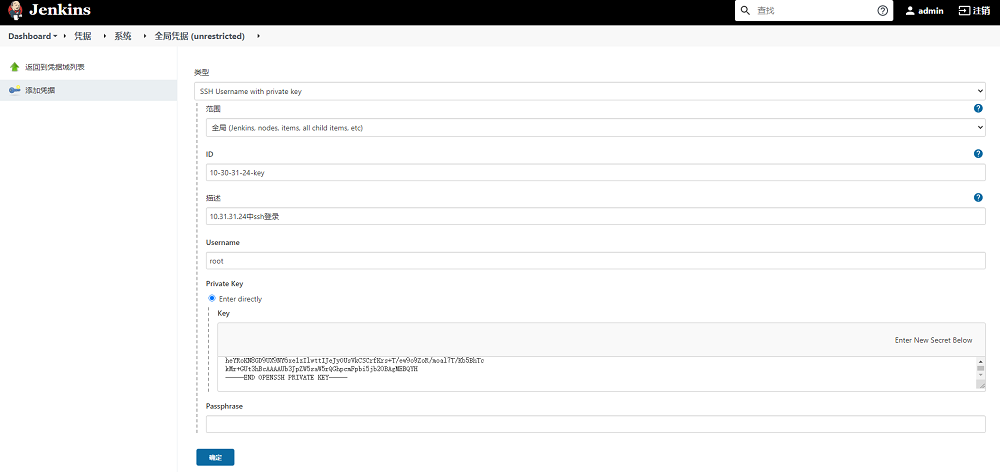
-
添加相关信息后,点击
确定按钮,会在凭据列表出现我们刚添加的凭据,需要记录ID的名称,后续在Jenkins流水线中会使用到,至此Jenkins凭据配置操作完成。
流水线配置
在Jenkins中添加类似如下的代码并执行测试,若测试正常,则表示Jenkins中基于SSH的远程部署全部配置完成,操作过程全部结束!
sshagent(credentials: ['10-30-31-24-key']) {
    sh '''if [ $TARGET_IP = \'10.30.31.24\' ];then
          ssh -o StrictHostKeyChecking=no root@10.30.31.24  \'bash -s\' < cicd/ssh_deploy.sh "${REGISTRY}/${DOCKERHUB_NAMESPACE}"  ${NODE_PORT} ${PRODUCT_PHASE} "xxx-batch-storage:${BUILD_TAG}"
          fi'''
}
有如下几点需要注意:
-
ID值为前面在Jenkins中添加凭据时输入的值 -
StrictHostKeyChecking用于当第一次连接到主机时,自动接受新的公钥 -
if判断用于只有当KubeSphere的界面中选择的要执行的目标服务器IP是我们选中的值时才执行对应的shell脚本,KubeSphere对应的执行界面参考如下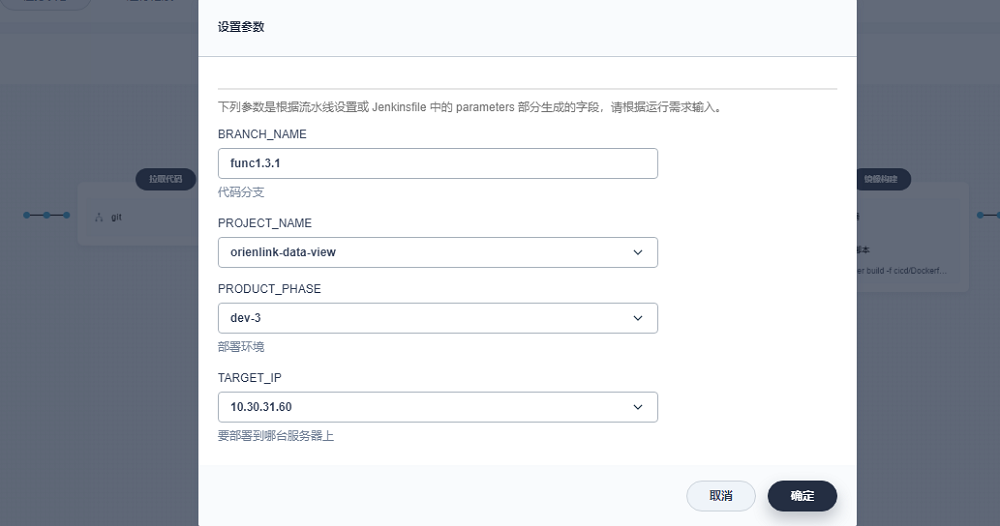
简单测试验证
基于前述的说明步骤,在KubeSphere中对10.30.31.24做个简单的测试:
-
在
10.30.31.24上执行docker ps的结果如下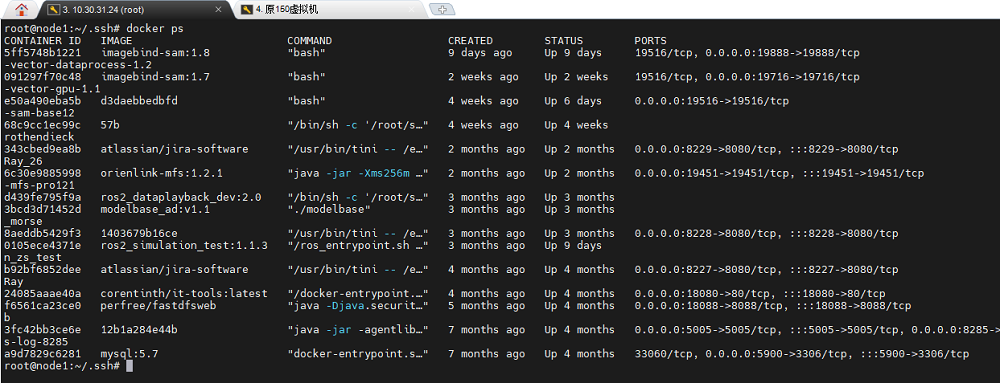
-
在
KubeSphere中建立类似如下流水线pipeline { agent { node { label 'maven' } } stages { stage('环境设置') { agent none steps { container('maven') { sh 'TZ="Asia/Shanghai" date' } } } stage('远程执行') { agent none steps { sshagent(credentials: ['10-30-31-24-key']) { sh 'ssh -o StrictHostKeyChecking=no root@10.30.31.24 "pwd;echo $HOSTNAME;docker ps"' } } } } environment { DOCKER_CREDENTIAL_ID = 'harbor-id' GITHUB_CREDENTIAL_ID = 'gitlab-id' KUBECONFIG_CREDENTIAL_ID = 'xxx-kubeconfig' REGISTRY = 'xxx.xxx.local:30005' DOCKERHUB_NAMESPACE = 'xxx-server-library' GITHUB_ACCOUNT = 'kubesphere' } } -
执行该流水线,在最后一个步骤的输出如下,可以看出
docker ps的执行结果符合预期(至于pwd和echo $HOSTNAME输出结果有差异是由于Jenkins容器本身执行时使用的是特定的账户以及特定的路径导致的)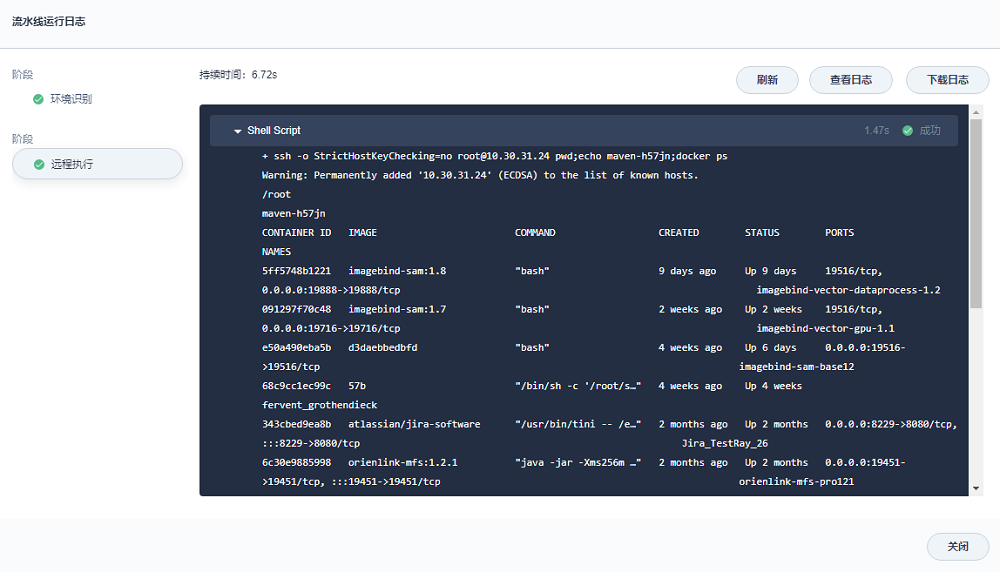
参考示例
远程shell脚本
注意: shell脚本在我们要通过ssh远程执行的那台执行者的电脑上,而不是位于被执行者的电脑上。
#!/bin/bash

harbor_url=$1
node_port=$2
build_phase=$3
image_version=$4
clone_name=$5
module_name=${clone_name}-${build_phase}

echo "===========harbor_url: ${harbor_url}"
echo "===========node_port: ${node_port}"
echo "===========build_phase: ${build_phase}"
echo "===========image_version: ${image_version}"
echo "===========module_name: ${module_name}"


echo "开始检查并移除旧的容器"
if [[ -n "$(docker ps -f "name=${module_name}$" -f "status=running" -q )" ]]; then
  printf "停止容器: "
  docker stop $module_name
fi

# 若容器存在,则删除
if [[ -n "$(docker ps -a -f "name=${module_name}$"  -q )" ]]; then
  printf "删除容器: "
  docker rm $module_name
fi

docker_command="docker run -d -p ${node_port}:${node_port}"
docker_command="${docker_command} -e TZ=Asia/Shanghai"
docker_command="${docker_command} --name ${module_name} ${harbor_url}/${image_version}"


printf "要执行的命令为:\n${docker_command}\n"
container_id=$(eval ${docker_command})

result=$(docker inspect -f {{.State.Running}} ${container_id})
if [[ "$result" = true ]]; then
  printf "\033[32m$module_name对应的容器启动成功,容器id为${container_id:0:12}\033[0m\n"
else
  printf "\033[31m$module_name对应的容器启动失败,容器id为${container_id:0:12}!\033[0m\n"
  exit 1
fi
Jenkins流水线
pipeline {
  agent {
    node {
      label 'maven'
    }

  }
  stages {
    stage('拉取代码') {
      agent none
      steps {
        git(credentialsId: 'gitlab-token', url: 'http://gitlab.xxx.com/xxx-backend/xxx-batch-storage.git', branch: '$BRANCH_NAME', changelog: true, poll: false)
      }
    }

    stage('识别系统环境') {
      agent none
      steps {
        container('maven') {
          script {
            def PROJECT_NAME='xxx-batch-storage'
            def BUILD_TYPE=PRODUCT_PHASE
            def NACOS_NAMESPACE=''

            env.PROJECT_NAME = PROJECT_NAME
            response = sh(script: "curl -X GET 'http://xxx.xxx.local:8858/nacos/v1/console/namespaces'", returnStdout: true)
            jsonData = readJSON text: response
            namespaces = jsonData.data
            for(nm in namespaces){
              if(BUILD_TYPE==nm.namespaceShowName){
                NACOS_NAMESPACE = nm.namespace
              }
            }

            response = sh(script: "curl -X GET 'http://xxx.xxx.local:8858/nacos/v1/cs/configs?dataId=xxx-custom-server-config.json&group=xxx-custom-config&tenant=26e0c3df-a0c7-4fe0-9b59-d04c5ac48481'", returnStdout: true)
            jsonData = readJSON text: response
            configs = jsonData.portConfig
            for(config in configs){
              project = config.project
              if(project!=PROJECT_NAME){
                continue
              }
              ports = config.ports
              for(port in ports){
                if(port.env!=BUILD_TYPE){
                  continue
                }
                env.NODE_PORT = port.server
              }
            }

            yamlFile = 'app/src/main/resources/bootstrap.yml'
            yamlData = readYaml file: yamlFile
            yamlData.server.port = env.NODE_PORT
            yamlData.spring.cloud.nacos.discovery.group = BUILD_TYPE
            yamlData.spring.cloud.nacos.discovery.namespace = NACOS_NAMESPACE
            yamlData.spring.cloud.nacos.config.namespace = NACOS_NAMESPACE
            yamlData.custom.nacos.ip = TARGET_IP

            // todo
            sh "rm $yamlFile"

            writeYaml file: yamlFile, data: yamlData
          }

        }

      }
    }

    stage('项目编译') {
      agent none
      steps {
        container('maven') {
          sh 'ls'
          sh 'mvn clean compile package -Dmaven.test.skip=true -U'
        }

      }
    }

    stage('镜像构建') {
      agent none
      steps {
        container('maven') {
          sh '''docker build -f cicd/Dockerfile \\
-t xxx-batch-storage:$BUILD_TAG  \\
--build-arg  PROJECT_VERSION=$PROJECT_VERSION \\
--build-arg  NODE_PORT=$NODE_PORT \\
--build-arg  PROJECT_VERSION=$PROJECT_VERSION \\
.'''
        }

      }
    }

    stage('镜像推送') {
      agent none
      steps {
        container('maven') {
          withCredentials([usernamePassword(credentialsId : 'harbor-account' ,passwordVariable : 'DOCKER_PWD_VAR' ,usernameVariable : 'DOCKER_USER_VAR' ,)]) {
            sh 'echo "$DOCKER_PWD_VAR" | docker login $REGISTRY -u "$DOCKER_USER_VAR" --password-stdin'
            sh '''docker tag  xxx-batch-storage:$BUILD_TAG $REGISTRY/$DOCKERHUB_NAMESPACE/xxx-batch-storage:$BUILD_TAG
docker push  $REGISTRY/$DOCKERHUB_NAMESPACE/xxx-batch-storage:$BUILD_TAG'''
          }

        }

      }
    }

    stage('ssh部署') {
      agent none
      steps {
        sshagent(credentials: ['10-30-31-60-key']) {
          sh '''if [ $TARGET_IP = \'10.30.31.60\' ];then
            ssh -o StrictHostKeyChecking=no root@10.30.31.60  \'bash -s\' < cicd/ssh_deploy.sh "${REGISTRY}/${DOCKERHUB_NAMESPACE}"  ${NODE_PORT} ${PRODUCT_PHASE} "xxx-batch-storage:${BUILD_TAG}" ${PROJECT_NAME}
            fi'''
        }

        sshagent(credentials: ['10-30-31-61-key']) {
          sh '''if [ $TARGET_IP = \'10.30.31.61\' ];then
          ssh -o StrictHostKeyChecking=no root@10.30.31.61  \'bash -s\' < cicd/ssh_deploy.sh "${REGISTRY}/${DOCKERHUB_NAMESPACE}"  ${NODE_PORT} ${PRODUCT_PHASE} "xxx-batch-storage:${BUILD_TAG}" ${PROJECT_NAME}
          fi'''
        }

      }
    }

  }
  environment {
    DOCKER_CREDENTIAL_ID = 'harbor-id'
    GITHUB_CREDENTIAL_ID = 'gitlab-id'
    KUBECONFIG_CREDENTIAL_ID = 'xxx-kubeconfig'
    REGISTRY = 'xxx.xxx.local:30005'
    DOCKERHUB_NAMESPACE = 'xxx-server-library'
    GITHUB_ACCOUNT = 'kubesphere'
  }
}

